
|
|
|
|
|
#1
 10-04-2012, 08:24 PM
|
||||
|
||||
|
No more 'saltine cracker' K networks
 First some epoxy.  Then some paint.  The satin was a bit too shiny so I switched to Rusty metal Primer. Much better  
Last edited by bandersen; 10-19-2012 at 01:55 PM. 
|
|
#2
10-04-2012, 09:35 PM
|
||||
|
||||
|
OOOOOOOhhh caramels
SR
|
|
#4
10-05-2012, 01:14 AM
|
||||
|
||||
|
Very nice. Those will blend in much better than the bareback kind I have made before.
Phil Nelson Phil's Old Radios http://antiqueradio.org/index.html
|
|
#5
10-05-2012, 02:02 AM
|
||||
|
||||
|
Thanks! I was half expecting you guys to say I was wasting my time on details no one would ever see

|
| Audiokarma |
|
#6
10-05-2012, 08:56 AM
|
|||
|
|||
|
Bob, that's what made the difference! That is a great idea. Now, you need to ink-stamp them with some numbers etc.
. Seriously, that did make the difference. Just like cleaning wires so that the original color jumps out at you!
|
|
#7
10-05-2012, 02:40 PM
|
||||
|
||||
|
NAAAHHH
Invent you own logo and stamp those works of ART  SR
|
|
#8
10-05-2012, 03:42 PM
|
||||
|
||||
|
LOL - maybe I will
My earlier dissection showed the resistors in the original networks were carbon comp, but what about the capacitors? Here's a closeup of a network without the opaque coating. This side shows the values.  While this side shows the components. I looks to me like the caps are made from ceramic cylinders dipped in a conductive coating. The more coating it has, the larger the value. That's what led me to try using NP0/C0G ceramic caps which seem to work just fine 
|
|
#9
10-07-2012, 10:28 PM
|
||||
|
||||
|
I coated the flyback with some RTV133. It comes out of the tube as a thin paste and is easy to spread on.
Not exactly a thing of beauty, but should do the trick. 
|
|
#10
10-08-2012, 08:42 AM
|
|||
|
|||
|
Nice job on the networks. Thoughts on flybacks
a member here did an interesting video on boiling out a flyback in molten wax, with a vacuum pulled to get all the air out. Based on the video it would seem that moisture is part of the problem, getting into the insulting strips of paper in the HV doughnut. My concern would be if there was excessive humidity and then the RTV seals it in. I have often though of boiling in hot medium (oil or wax) under a vacuum, then building a dam around the flyback and sealing in a compatible potting compound. this would of course require removing the fly from the mount, removing the core, blocking the core hole to prevent the compound from fouling that. A lot of work for sure, but seems like the ultimate fix.
|
| Audiokarma |
|
#11
10-08-2012, 01:53 PM
|
||||
|
||||
|
Quote:
__________________
Tom C. Zenith: The quality stays in EVEN after the name falls off! What I want. --> http://www.videokarma.org/showpost.p...62&postcount=4
|
|
#12
10-08-2012, 04:24 PM
|
||||
|
||||
|
Yes, I've seen that cool video. This flyback wasn't that bad though. Just some shallow surface cracks. It's also been rather dry lately and I've have the set running a while so I'm hoping moisture won't be an issue.
Here it is before the RTV. 
|
|
#13
10-10-2012, 09:23 PM
|
||||
|
||||
|
I've been having fun with the dead power switch tonight. I was able to get it apart and clean it up so it makes good contact, but the latching mechanism just isn't working right.
After a couple clicks, it stops working  The contacts are also pretty worn down so even if I did get it working I don't think it would last long. The contacts are also pretty worn down so even if I did get it working I don't think it would last long.I've read that replacements are impossible to find. It's label "CTS Type J" on the bottom. Any ideas ? I'll go looking through my old junk control box and see what I can find. 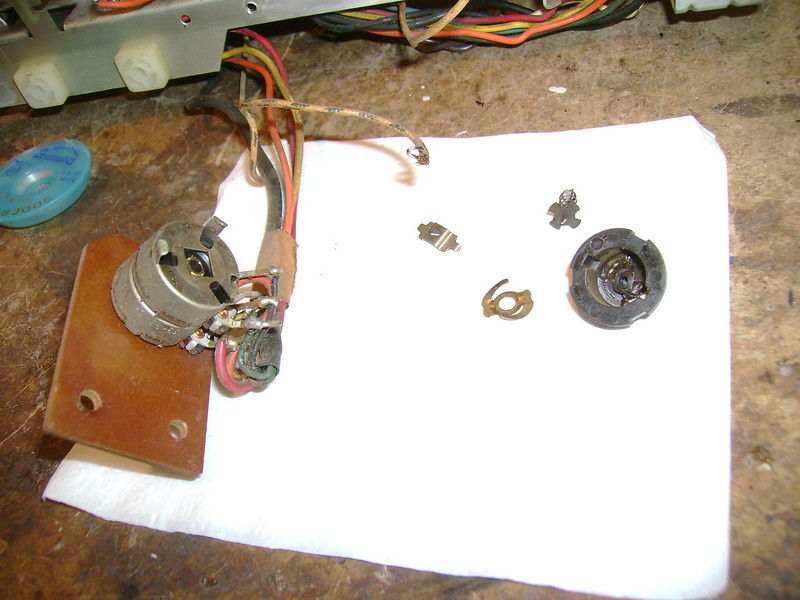
|
|
#14
10-12-2012, 04:03 PM
|
||||
|
||||
 (picture of the back side of a module, with circuit board style traces with values printed on, seen in post #100) One could get some of the larger surface mount resistors and mount them between those traces. And if the voltage requirements and tolerances are reasonable and compatible with surface mount capacitors, those too.
__________________

|
|
#15
10-11-2012, 06:54 AM
|
||||
|
||||
|
Bob: look at Lowe's or = and get a push on / push off canopy switch, used in a lot of light fixtures. You should be able to rig that behind the control pretty easily.
__________________
Reece Perfection is hard to reach with a screwdriver.
|
| Audiokarma |
 |
|
|


 Hybrid Mode
