
|
|
|
|
|
#2
 01-10-2012, 06:57 AM
|
||||
|
||||
|
Quote:

|
|
#3
01-10-2012, 02:10 AM
|
||||
|
||||
|
Semi gloss is a good choice for refinishing old sets. Modern full gloss looks too gaudy to me, and not at all representative of the original finish.
|
|
#4
01-10-2012, 06:59 AM
|
||||
|
||||
|
Quote:
|
|
#5
01-10-2012, 08:04 AM
|
||||
|
||||
|
Quote:
You should only need to tell your refinisher what gloss level you want. There is no need to use flat or semi-gloss finishes. Nitrocellulose lacquer finishes need to be sanded and rubbed out when done, so you can get any gloss level you want during the polishing stage. This is how it was originally done. Semi-gloss finishes use flatteners to obscure the gloss resulting in a weaker and somewhat cloudy finish. A gloss finish can be polished to any level while a semi-gloss can never be polished to a full gloss level. Also if you don't polish a gloss lacquer finish it will look "plasticy" and terrible. Some refinishers today will use modern CAB or catalyzed lacquers which if sprayed in a dust free environment don't really require polishing, so a semi-gloss might look better, but it will still look cloudy. Attached is a picture of my 621 that I refinished with gloss nitrocellulose lacquer and rubbed out with 0000 steel wool. Darryl Last edited by tubesrule; 01-10-2012 at 08:09 AM.
|
| Audiokarma |
|
#6
01-11-2012, 03:17 PM
|
||||
|
||||
|
Quote:
Lou was very backed up at the moment so I think that I'll have the chassis restored before I get the cabinet back from him. I did offer a little extra money to get the set done faster, if he takes me up on that offer then they might both be finished in a similar time.
|
|
#8
01-12-2012, 07:52 PM
|
||||
|
||||
|
Works of art indeed Sandy. I still like my GE 801 a bit more as far as aesthetics but the 621 is an amazing design.
I still haven't been able to find a replacement for the bottom of the electrolytic cap I broke, and not wanting to remove another multi-stage can until I finished that one, I decided to start on the paper caps. I was surprised at how much easier it was to restuff the paper caps than it was to rebuild the electolytics. My wife got me a new soldering iron for Christmas so I used my old soldering gun to melt the old wax and cap out of the cardboard tube. Then I melted and cleaned the wax off of the outside of the tube. After I had a clean empty tube it was ready for the new cap. 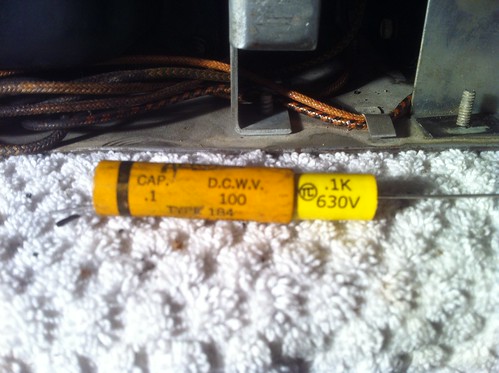 Perfect fit! After putting the new cap inside the old housing I filled the ends with hot glue and shot a coat of lacquer on the cardboard to shine it up a bit and repel dust (the idea came from Hugo Holden's amazing 621ts restoration http://www.earlytelevision.org/holden_621.html, although he used varnish). There was one cap in the horizontal output section that had been previously replaced with a modern cap. You can see my restuffed cap just to the right of it. 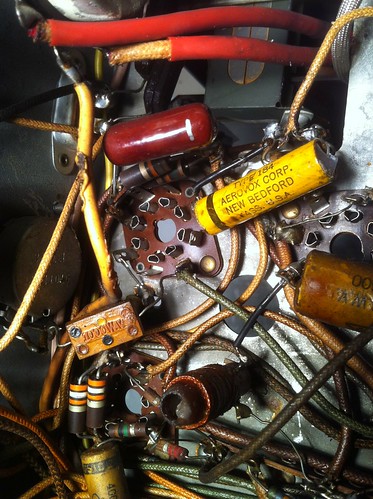 Luckily I had saved all of the caps that I removed from the last set I recapped for just such an occasion and had a replacement value for it.  I restuffed a total of six caps tonight and honed my skill of filling the ends smoothly with glue towards the end. The rest of the paper caps should be no problem. You can see the six caps all towards the top of the picture below. I'm really happy with the look of restuffing versus just cutting the old caps out and replacing them with something that just doesn't look original. Well worth the effort! 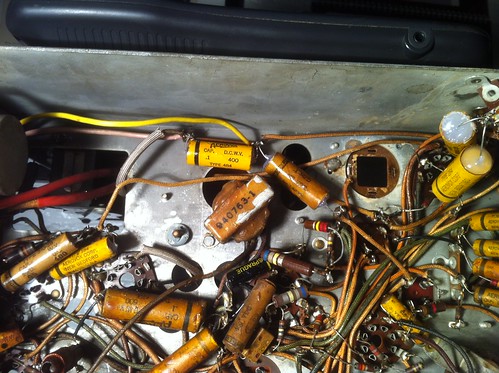
|
|
#9
01-12-2012, 09:13 PM
|
||||
|
||||
|
Quote:
__________________
Chris Quote from another forum: "(Antique TV collecting) always seemed to me to be a fringe hobby that only weirdos did."
|
|
#10
01-12-2012, 10:13 PM
|
||||
|
||||
|
I reciently started mixing some of the original wax in to container of hot glue to tint the glue a more original color. I then took pieces of the mix and melted them into the ends of the cap using a soldering iron. I used to take wax from other old caps and use it for restuffing, but once one has dismantled all spare junk caps for wax....cutting with hot glue seems logical (it also don't stink as much).
__________________
Tom C. Zenith: The quality stays in EVEN after the name falls off! What I want. --> http://www.videokarma.org/showpost.p...62&postcount=4
|
| Audiokarma |
|
#11
01-13-2012, 06:38 AM
|
||||
|
||||
|
That was the only part I wasn't really happy with was the color of the glue at the ends. Any one ever tried a brown glue stick? A quick google search brought me this http://www.glu-stix.com/shop/page/pr...5b1ac34df.html. I have no concept of how much glue is in 5 pounds. Maybe we can do a group buy if it works.
|
|
#12
01-13-2012, 02:17 PM
|
||||
|
||||
|
Yes, I've been using brown and black glue sticks for a while with good results.
You can get them for a few bucks from various sellers on ebay.
|
|
#13
01-14-2012, 08:43 PM
|
||||
|
||||
|
I got back under the chassis tonight. I'm still taking my time and making each and every action I take as deliberate as I can. I found another capacitor that was replaced at some later time.
 You can see that there is a pretty large glob of solder on the connection point of that new cap. I've noticed shoddy work on the two obvious replacement parts in the set, both had way too much solder on the connections and you can clearly see that the repairman melted the insulation on a wire in the area when soldering a lead. You can see it on the left side of the picture below. One of the advantages doing one capacitor at a time and shooting each one with lacquer is that I have lots of time to survey the set as I wait for the lacquer to dry. One thing I noticed on one of these "breaks" was that R187(according to the Riders schematic), the high voltage rectifier winding resistor, is going to need to be replaced.  I'll file that in my noggin for later when I focus on resistors. I still haven't been able to get out to my local antique electronic shop for a replacement multi-stage electrolytic cap to replace the one I snapped but I'm over half way finished with restuffing/replacing the paper caps. The top half of the set (as it sits on my bench) is now finished. 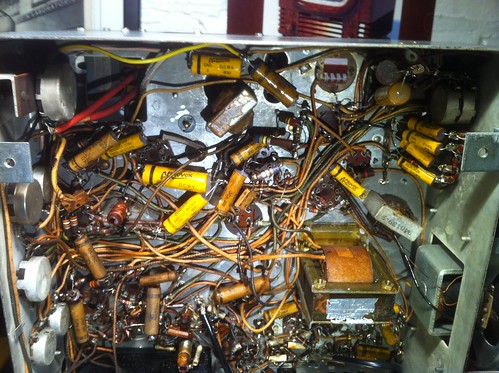
|
|
#14
01-16-2012, 09:41 PM
|
||||
|
||||
|
Almost done with the paper caps and wouldn't you know it I'm short one value
 . Put the order in yesterday for the replacement. I'm hoping to have the paper caps finished by the end of the week and move on to electrolytics by the weekend. . Put the order in yesterday for the replacement. I'm hoping to have the paper caps finished by the end of the week and move on to electrolytics by the weekend. I did run into one capacitor value that I couldn't find a direct replacement for, .0025mfd. I used one .0015mfd and one .001mfd in parallel. 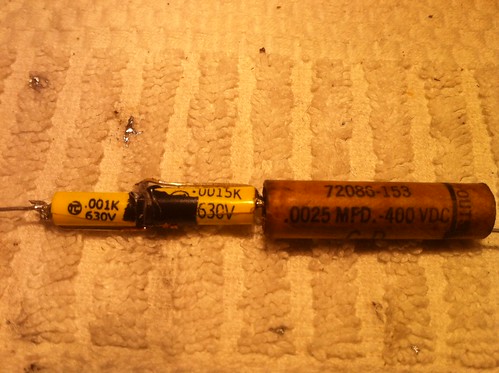 I used electrical tape to wrap each lead on each cap and then hot glued the two caps in place. Did any one else manage to find a direct replacement for these caps?
|
|
#15
01-17-2012, 08:53 PM
|
||||
|
||||
|
Quote:
__________________
Chris Quote from another forum: "(Antique TV collecting) always seemed to me to be a fringe hobby that only weirdos did."
|
| Audiokarma |
 |
|
|


 Hybrid Mode
