
|
|
|
#1
 01-03-2005, 10:12 AM
|
||||
|
||||
|
Uncle!!
Okay, I give up. Apparently, I'm just too stupid for this sort of thing. Pardon me while I rant.
So I got my 50 bucks worth of electrolytic caps from Moyer and tried installing them in my Zenith roundie (Laura, for those of you who remember.) How the h-e-double toothpicks are you supposed to do this? After a couple of hours, I managed to replace about three of them. The ones I could find and get at. Finally gave up in frustration. F'rinstance: C1 is just a single cap, not one of those multi ones. It's in a cardboard tube and it's riveted to the chassis. Look at the underside and what I find is ONE terminal tab. Where's the other one? Is that it, buried under a blob of silicone? Scraped enough of the goo off to jumper across it and it didn't do any good. Foo. Moving right along, I try number 3 or 4, I forget which. They're the multi-caps in cans. Locate the tabs under the chassis. But what gets connected to what? Not wanting to blow up the house, I skip those, too. Studying the schematic, I see that one of the lytics gets connected to a red/yellow wire, apparently coming off the transformer. Well, that should be straightforward. Except all the wires are black! Maybe there's a color underneath. Try rubbing the wires with nail polish remover; no good. Try scraping them with a razor knife. Didn't do squat either. Arrrrrgggggghhhhh! How do you guys do it? Everyone makes it sound so simple--"Pulled the chassis and replaced the 'lytics last night. Some of the gb6's were off spec, so I did those too. And one of the gronkulators was grounding to the frammis coil, so I adjusted the spark gap and then reamed out the phlegmster as well..." Again, arrrrrrggggghhhhh! And just so you know I'm not totally helpless, in the past week I redid the floor in my bathroom (including removing and replacing the terlet), fixed the motor on my stereo, and even made slipcovers for the chairs in my den. Sorry for the rant. Just frustrated. Frankly, I think I need to up my dosage... veg
__________________


|
|
#2
01-03-2005, 10:38 AM
|
||||
|
||||
|
Use the ESR meter to check those electrolytics. It will do the job! Jumpering caps is not a good troubleshooting technique in my opinion.
The way to replace can caps is to cut the terminal at the cap with a big pair of dikes underneath the solder joint. That way, all the resistors, wires, etc. are still connected. Then, break the connections of the components on that lug and re-establish in the same fashion on the new electrolytic. Terminal strips are needed to make the connections to the new caps.
|
|
#3
01-03-2005, 12:50 PM
|
||||
|
||||
|
I think you will need to find some space on the underside of the chassis where the new caps will physically fit & where you can find some way to tie them down. (you shouldn't just let them hang) You could use a wire tie to secure the cap. If the cap should be grounded you can run the ground end of the new cap to the nearest good ground, there should be many good tie points on to the chassis. Install a terminal strip in a convenient location to both the new & old caps. Now move all the wires, resistors, etc. from the old cap to one of the tabs on the terminal strip. Finally, connect the new cap there & solder it up. It can get tricky, for sure. Space can be a problem; wires might not reach where you need them to and may need to be re-routed or extended. Often if there is a resistor connected to one of the caps it won't be worth trying to save & you should just install a new one. You can get many sizes & styles of terminal strips-some have a grounded post in the middle; there are ones with 2, 3, 4, however many tabs you need. Sometimes you can move all the new caps to one strip, if there is room to get everything in there close. You have to be real careful that you don't get your wires crossed up while doing this-good idea to switch one a time, solder it & everything, so you can't get it messed up. Remember that on most can caps there is no negative wire-the can is the negative side; if the negative side is supposed to be connected to ground it will be firmly mounted to the chassis & soldered as well. Careful-not all of these caps will have their negative to the chassis. These will use a piece of phenolic that the can is mounted to so it is insulated from the chassis, and the can will be connected by wire to wherever it needs to go.
Double check your work, be sure there are no crossed wires or bad connections, and be sure you have the polarity right on the new cap. Installing the new cap backwards might be the worst thing you could do! If I got any of this wrong somebody will correct me...I had to learn most of it by myself & I have screwed up plenty!
__________________
Bryan
|
|
#4
01-04-2005, 11:03 AM
|
||||
|
||||
|
Chad: I appreciate the help, but I don't think you know what you're dealing with. To wit:
Quote:
Oh. Okay. Er...uhm...ESR meter? Quote:
Bryan: Sending my thanks out to you, too! Like Chad, though, I think you're giving me wayyyyyy too much credit: Quote:
My question is... when I look at the bottom of some of the "can" caps, I see, oh, four or so little terminal thingies. How can you tell which value cap is connected to each lug? And which is the positive and which is the negative? Ick. My Heathkit is starting to do the same thing, so I'm going to be in for a loooooonnnnnng bout of frustration  . .veg 
__________________
|
|
#6
01-04-2005, 03:06 PM
|
|||
|
|||
|
Quote:
Anthony
|
|
#7
01-04-2005, 03:23 PM
|
||||
|
||||
|
Quote:
But I like Anthony's explanation a lot better!  An ESR meter measures Effective Series Resistance, a measurement that can indicate whether or not a capacitor has failed. I would strongly suggest that you either get a book on basic electronic circuits and/or basic electronic repair, or find a local guy who works on old tv's to help you through your beginning education. Older tube-type tv's have enough voltage inside to kill you stone, cold, dead if you make just one simple mistake while it's plugged in. I mean, dead as in dead before your body hits the floor. Literally. Another idea might be to pick up a few older tube radios to practice on. Doing capacitor replacements, checking tubes, etc., is a lot easier on a simple radio. TV's are a challenging way to get into restoring vintage electronics. Otoh, most simple tube radios don't have power transformers, which means the chassis is almost always hot when it's plugged in, so you still need to be careful. At least the voltages aren't measured in kilovolts. Rule Number One regarding testing voltages etc. on live equipment: Keep one hand in your pocket. It's much less likely you'll get across 750v to ground that way.  Clay
__________________
I may be growing older, but I refuse to grow up. 
|
|
#8
01-06-2005, 08:35 PM
|
|||
|
|||
|
Hi veg.
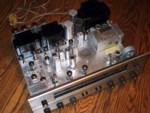
On the left of your screen is a cap. in the middle dykes. on the right side a multi meter with a cap check function. I have vary little book smarts so i call it a cap meter. You put in 3 caps so far. Have you fired up the set? The cap with the cardboard is a can {c1}. The cardboard is there so you don't get zapped by it. Touching the chassis and can at the same time would hurt. big time. Even if it seems ok replace it. When you replace it put electrical tape on it to be safe. ED
|
 |
|
|


 Linear Mode

