
|
|
|
#16
 02-15-2015, 11:06 PM
|
||||
|
||||
|
2 of the 4 terminals on the replacement are duplicates of the other 2. With a DMM you will find that there will be 2 pairs that always have continuity, and that when pressed all pins will have continuity with each other.
Essentially it is a SPST with extra terminals.... If the mech can deal with the switch not being centered you could clip the duplicate pins and only solder 2 (if that works some superglue between the new switch and the board may be a good idea) ....Other wise you could possibly solder the duplicates together, and add new centered leads to go through the board.
__________________
Tom C. Zenith: The quality stays in EVEN after the name falls off! What I want. --> http://www.videokarma.org/showpost.p...62&postcount=4 
|
|
#18
02-16-2015, 12:27 AM
|
||||
|
||||
|
Thanks for the info. That gives me some ideas to try.
Phil Nelson
|
|
#19
02-18-2015, 07:31 PM
|
||||
|
||||
|
Woo-hoo! The new switches worked.
The replacements will fit the PC board holes diagonally if you turn them 45 degrees and snip off opposing leads. I also had to bend the leads slightly inward to fit the holes. They have a slightly shallower body and a longer shaft than the originals, which makes them a little taller, overall. 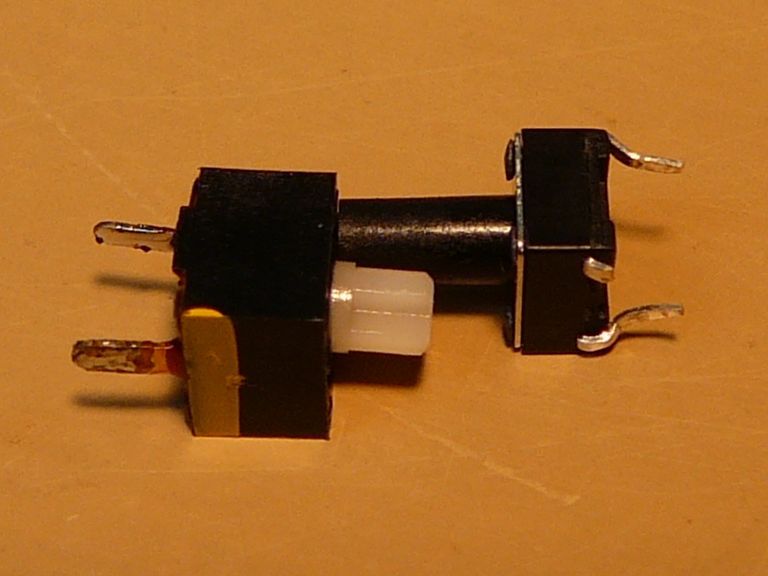 I was afraid the new switches would be too tight vertically, so I skimmed a bit off the shaft ends with a Dremel tool. 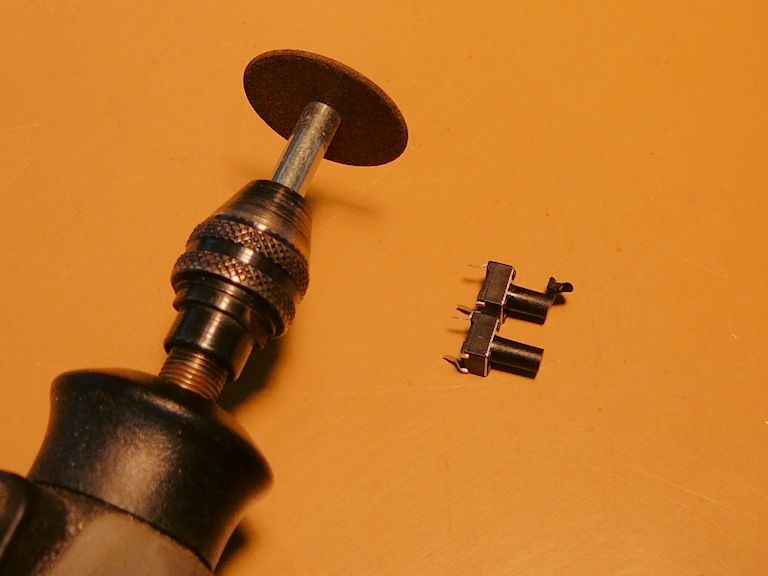 I won't pretend it was easy to install these teeny switches and get everything back together, but with patience it all got done. The red arrows point to the new switches; note the diagonal placement.  Now, all four switches are operational. I can select low/high/UHF, turn the channel indicator on/off, and choose channel up/down in auto tuning mode. Pretty fun! I had never been able to use auto tuning before, so it was gratifying to see that kick in. I'll eventually write an article for my website showing the process with some additional photos. Thanks again to WISCOJIM, Electronic M, and NoPegs for their great advice, and especially for the free parts! Jim mailed me 8 extra switches, and I doubt I'll ever need the extras. (I don't like repeating projects, and cramped PC boards are not my favorite thing to work on.) If anyone else would like some switches, send me a PM and I'll be happy to pass 'em along. Regards, Phil Nelson Phil's Old Radios http://antiqueradio.org/index.html
|
|
#21
02-21-2015, 02:48 PM
|
||||
|
||||
|
As threatened, here's a little article with some additional photos of the switch replacement:
http://antiqueradio.org/SonyKV-4000ColorTelevision.htm Regards, Phil Nelson Phil's Old Radios http://antiqueradio.org/index.html
|
|
#22
02-21-2015, 06:06 PM
|
||||
|
||||
|
Quote:
Phil, in the name of "full root-cause investigation," would you consider parting with some or all of your original switches that went bad? I'd like to do two things with them:  First, carefully autopsy them to see exactly what is the cause of failure, since this issue affects many if not most of the surviving examples of this model. Second, I want to attempt to "graft" a modern construction replacement tactile button switch onto the "roots" of the original switches. If successful we could then begin a very interesting game of lets-pass-the-parts.  If I'm successful in refitting all of your removed dead switches, then the reincarnated switches can be sent to the next person that desires a return to the pushbutton auto tuning age of wonders. Since the parts that would be sent to them are direct drop in replacements, the task of swapping them out becomes a straightforward process: just desolder the old and busted switches, put in my hybridized refurbished units, button the chassis back together, and then send their duds my way for rework in preparation for another go-around. I'm confident that I have all the tools and skills needed to make reworked switches using strategic pieces of the old ones (Specifically the baseplate with the perfectly sized and oriented leads.) that won't require any trimming, rotating, or bending; and will have actuator shafts that stick out precisely as far from the surface of the board as the originals did. The end result should be that the feel of the front panel button push is just like the originals felt the day it came out of the box.  If anyone else is interested, you can pull out your broken buttons and send them my way, your set will just be on the bench for a few days without switches, possibly up to two weeks if I somehow happen to not have any properly sized buttons in my stash. I'd then have to select and order suitable replacements. I'd put the chances of that happening around 30% or less... I already have quite an exciting assortment of tactile switches on hand. 
|
|
#23
02-21-2015, 07:30 PM
|
||||
|
||||
|
Sure, you can have the old ones. PM sent.
I was thinking of cutting one open, just to see what's inside, but you'll probably do a neater job. Phil Nelson Last edited by Phil Nelson; 02-21-2015 at 08:12 PM.
|
|
#25
02-23-2015, 02:16 PM
|
||||
|
||||
|
Quote:
Not only do I hope to do a neater job, but the YL loves macro photography, so look forward to seeing some very up close and personal autopsy shots soon.
|
| Audiokarma |
|
#26
03-07-2015, 02:20 AM
|
||||
|
||||
|
Gentlemen...
I have met with success!  Photos forthcoming tomorrow when the YL actually remembers to grab her camera bag complete with macro stuff. Quote:
What actually seems to cause the failure is the (tiny!) chunk of conductive plastic popping through the cone that holds it, which explains why the "stalks" don't have any downward movement... Photo details hopefully tomorrow evening.
|
|
#27
03-07-2015, 06:08 AM
|
||||
|
||||
|
Phil,
Nice job! Just one little nit-pick in your website description of the KV 4000 CRT. "--- with very fine dot pitch." The KV 4000 uses a Trinitron CRT with vertical stripes, not dots. I'm sure you knew that though.
|
|
#28
03-07-2015, 01:46 PM
|
||||
|
||||
|
Thanks for your note. I have corrected the article.
Phil Nelson
|
|
#29
03-08-2015, 01:46 AM
|
||||
|
||||
|
Photos are here!
Successful graft attempt. Ugly but meets the design specifications. I'm exploring options to improve it aesthetically.  Precisely 3/8" from board to tip, and 1/64" shorter when depressed.  So where does the magic happen inside? Here's a peek...  This is the second one I opened, the carbon slug is still almost where it should be, but it has slipped just a bit too far into the plastic cone that holds it.   This is how the first one looked when I opened it up.   Here's more or less how the "graft" works out.  In addition to aesthetic improvements I need to select a suitable adhesive to fill the gap here that is non-corrosive, non-conductive, and able to withstand soldering temps at least briefly. Without something holding it together things can get out of kilter when actually installing the units.  Another option I found in my tac-switch drawer would be these guys. They have exactly the necessary lead spacing to be drop-in replacements, but to get everything to line up right they'll need a bit of a shim between them and the board to bring everything up to the required height.  Look for "revision 2.0" coming shortly. Thanks again to Phil for getting the ball rolling on the whole thing.
|
|
#30
03-08-2015, 08:46 PM
|
||||
|
||||
|
Well, I have to admire your micro-surgery skills (and patience!), both better than mine.
Phil Nelson
|
| Audiokarma |
 |
| Thread Tools | |
| Display Modes | |
|
|


 Personal website dedicated to Vintage Television

 Linear Mode

