
|
|
|
#32
 12-15-2009, 02:36 PM
|
||||
|
||||
|
Quote:
") Quote:
Yes, I just discovered that shaft is for a second hand. It works with an escapement to rotate in 'ticks' rather than a smooth rotation. 
|
|
#33
12-15-2009, 03:34 PM
|
||||
|
||||
|
Nice video
 Found this description of the Westinghouse "Automatic Control": http://clockhistory.com/newhavenwestinghouse/index.html  jr
|
|
#34
12-15-2009, 04:07 PM
|
||||
|
||||
|
Wow, thanks! Mystery solved
 I suppose it's up to the owner to notice that the lights have come back on, but the clock isn't running and they'll need to reset the slider and correct the time. Quote:
Last edited by bandersen; 12-15-2009 at 04:11 PM.
|
|
#35
12-15-2009, 05:39 PM
|
||||
|
||||
|
Quote:
A suitable second hand should be available from any supplier of clock parts. There are several big companies that sell new and restoration parts for clocks, they all have online catalogs.
__________________
Growing up leads to growing old and then to dying, And dying to me dont sound like all that much fun... -John Mellencamp
|
| Audiokarma |
|
#36
12-15-2009, 07:05 PM
|
||||
|
||||
|
I would first squirt some CRC electronics cleaner downward through the clock mechanism to flush out the dirt: hold it over the garbage can. Let dry, then light oil as suggested, with a toothpick, on each bearing surface.
You could have that speaker reconed, but if you are going to try to fix it, I highly recommend using fabric glue (craft store, fabric store). It's a bit thicker than Elmer's and you might want to thin it a little with water for making the repairs. Once the repairs are made and dry, thin the glue some more with water and paint the whole face of the cone with it. It's white but dries clear and remains flexible. You don't want it too thick at this step. It will reinforce the old paper and give it some strength to survive another 80 (!) years. I had a cone with no parts missing but it was full of little hairline cracks around the outer compliance. The paper was just getting brittle. Coating it with thinned fabric glue really strengthened it and it sounds great, takes volume the way it should with no buzzes.
__________________
Reece Perfection is hard to reach with a screwdriver.
|
|
#37
12-15-2009, 07:28 PM
|
||||
|
||||
|
I have some "Fray & Stay" fabic glue I picked up to stop speaker cloth from fraying.
I wonder if that would work on the speaker ?
|
|
#38
12-16-2009, 01:31 PM
|
||||
|
||||
|
Go buy some Ailene's Tacky Glue at a craft store or Wal-Mart. It's what most people use for speaker re-surround jobs, and I've very successfully used it with tissue paper to repair cone damage.
__________________
Growing up leads to growing old and then to dying, And dying to me dont sound like all that much fun... -John Mellencamp
|
|
#39
12-16-2009, 07:18 PM
|
||||
|
||||
|
Another source of paper is coffee filters. After the patch edges are dry you can paint the whole cone with black acrylic artists paint, the kind in a jar used for poster paint. After that's dry you can coat the whole cone with the thinned fabric glue.
Those upward-facing speakers were not the best idea. They were subject to damage and to dust and debris falling into them. After it's all back together you might want to operate the speaker face down for a while to see if the vibration will work out any dirt stuck down in the voice coil gap.
__________________
Reece Perfection is hard to reach with a screwdriver.
|
|
#40
12-16-2009, 11:03 PM
|
||||
|
||||
|
Quote:
 Quote:
I don't have any speaks to scavenge any from right now. Should I pick up an old speaker just for it's cone paper, or could I substitute some sort of heavy paper stock ?
|
| Audiokarma |
|
#41
12-17-2009, 08:15 PM
|
||||
|
||||
|
When I bought my Radiobar, it looked like someone put their foot through the speaker. I patched it up using the methods described earlier in this thread, but I still had a big hole to patch. I wound up applying a coffee filter patch from the back of the speaker using some rubber cement to glue it to the cone. When it dried, I applied a layer of Aleen's tacky glue to to coffee filter patch visible from the front of the speaker. I then put another coffee filter piece over that, creating a "patch sandwich" from both sides of the cone. I used a little more rubber cement, and after it all dried, it sounded great. In fact, the Radiobar has some of the best bass response of my consoles...too bad the receiver itself is such garbage.
|
|
#43
12-18-2009, 12:45 AM
|
||||
|
||||
|
Quote:
 ), it was held in place by friction. Since there isn't a single, scuff, scrape or mar on my wooden clock face frame, I'm voting for no cover at all. ), it was held in place by friction. Since there isn't a single, scuff, scrape or mar on my wooden clock face frame, I'm voting for no cover at all.
|
|
#44
12-21-2009, 02:39 PM
|
||||
|
||||
|
I picked up a few items for the clock. I'm not sure what the second hand is supposed to look like so I selected several.
I think they all look pretty good, but maybe I should clip off the sculpted end so it's more angular like the other hands I just need to cut down the brass shaft that attaches it. I also picked up a needle oiler and some new #0 screws. I never thought I'd be restoring a clock! 
Last edited by bandersen; 12-21-2009 at 06:47 PM.
|
|
#45
12-23-2009, 02:51 AM
|
||||
|
||||
|
Speaker repair
Thanks to all your great tips, I've finished restoring the speaker
 I used brown coffee filter paper and Aleene's Original Tacky glue. Here's it is all torn up.  First patches applied. 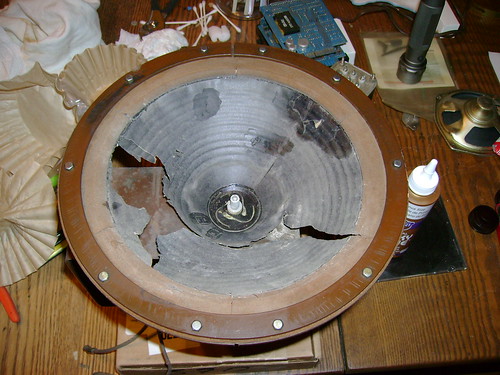 I used some painters tape to hold it together while the patches set up. 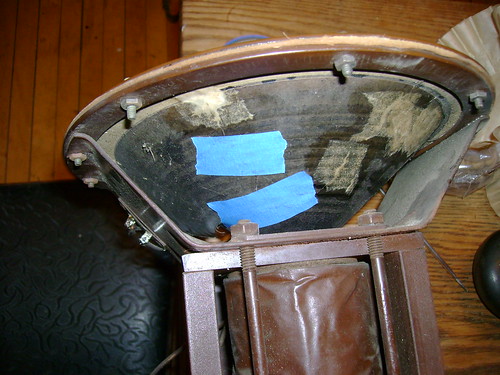  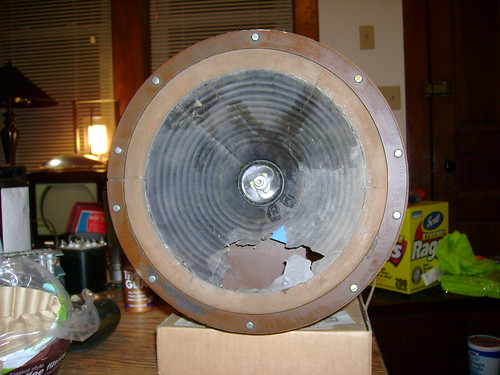 Down to just that big hole to fill. 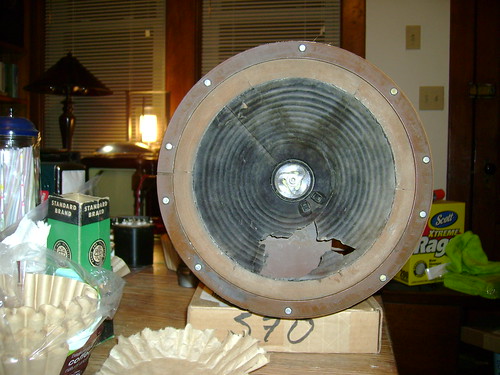 I decide to try making a preformed patch by using a plastic sheet over a good portion of speaker cone. Then, I cut a suitable piece of coffee filter and soaked it in diluted glue. It work out fairly well. I was definitely able to capture the curvature, but the ridges aren't very distinct. Even so, I think it's a promising technique. 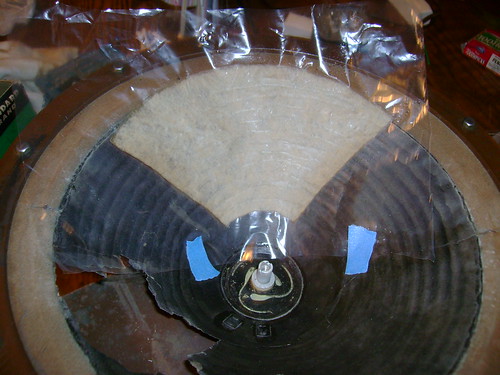 Here's the patch in place. 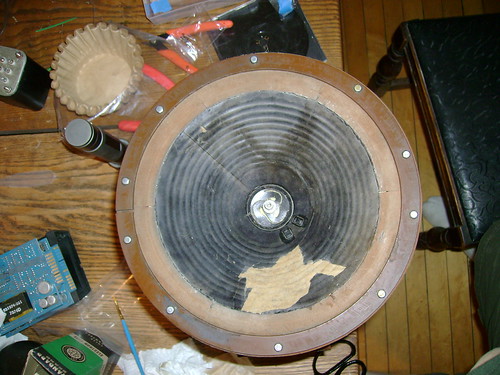 Next, some black acrylic paint. The patch wrinkled a little during the gluing and painting, but I happy with it. 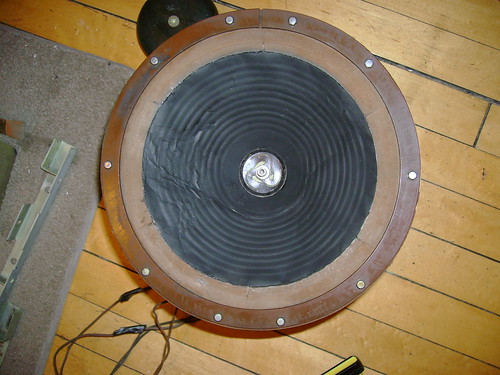 Here's the backside. 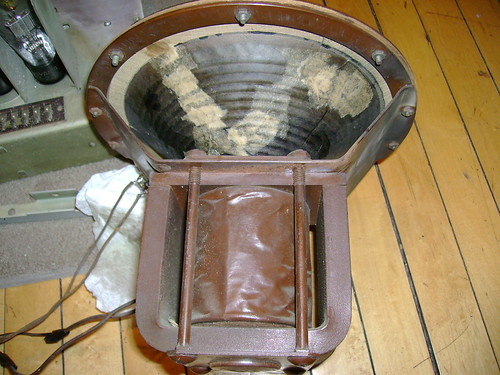 Finally, I cleaned up that big wooden plug and screwed it back in. Is this some type of vibration damper 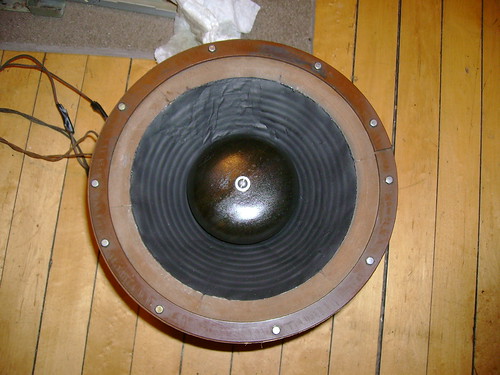 Here's a YouTube video I made while restoring the speaker. If you make it to the end you can hear the radio playing 
Last edited by bandersen; 12-23-2009 at 02:57 AM.
|
| Audiokarma |
 |
|
|


 Linear Mode

