
|
|
|
#61
 07-23-2016, 09:20 PM
|
||||
|
||||
|
In the end I made an extension cable for the original yoke and put it in the jig. That wasn't easy, since the original yoke has this odd plug that looks octal but has 9 pins. Fortunately I had such a plug in my box of test jig cables, so I was able to bring it up that way. Raster came up but I had no video, so I went through all the tubes in the chassis. Found a dead 6BR8 in the tuner and a dead 6AH6 which is the 4th IF tube. New ones are on their way, hopefully once those are in we will see some color bars.
__________________
Evolution... 

|
|
#62
07-28-2016, 03:54 PM
|
||||
|
||||
|
Lookie what we got here, cabinet guys came through today in fine style. I think I'll use them for all my future restorations, they did a very good job on this. Here's the website, in case anyone in the area was wondering: http://schoenbauer.com/
Ignore the wires puking out the top of the speaker mounting board, I already fixed that. The speakers are both shot anyhow, I need a 6x9 and a little tweeter as well (4" I assume). Grill cloth was sourced from AES, they had something very similar to the original stuff.  I think the tubes for the chassis came in the mail today as well, which means that by the weekend I should be able to dive back into the chassis and figure out why I'm not getting a signal through the front end. Wish me luck! 
__________________
Evolution...
|
|
#63
07-28-2016, 07:42 PM
|
||||
|
||||
|
Fantastic job on the cabinet & the grill cloth. Looking forward to your progress reports.
-Steve D.
__________________
Please visit my CT-100, CTC-5, vintage color tv site: http://www.wtv-zone.com/Stevetek/
|
|
#64
07-28-2016, 10:57 PM
|
||||
|
||||
|
Ooh, dat's purdy!
__________________
Tom C. Zenith: The quality stays in EVEN after the name falls off! What I want. --> http://www.videokarma.org/showpost.p...62&postcount=4
|
|
#65
08-01-2016, 03:58 AM
|
||||
|
||||
|
That looks pretty sweet!
__________________
My TV page and YouTube channel Kyocera R-661, Yamaha RX-V2200 National Panasonic SA-5800 Sansui 1000a, 1000, SAX-200, 5050, 9090DB, 881, SR-636, SC-3000, AT-20 Pioneer SX-939, ER-420, SM-B201 Motorola SK77W-2Z tube console McIntosh MC2205, C26 
|
| Audiokarma |
|
#67
08-02-2016, 01:56 PM
|
||||
|
||||
|
Quote:
 
|
|
#68
08-03-2016, 07:02 PM
|
||||
|
||||
|
Sure, I'll PM my address if you want to donate them to the cause. Just measured the voice coil on the high frequency speaker here, and it's 12 ohms as well.
__________________
Evolution...
|
|
#71
08-04-2016, 08:42 PM
|
||||
|
||||
|
I have had great luck with Liquid Tape as a patch for minor tears in speakers as long as the ends touch. It stays flexible forever. And in my misguided youth, I have been know to treat a cone with some oily spray I had on hand to remoisturize it. Use at your own risk.
__________________
Once you eliminate the impossible...whatever remains, no matter how improbable, must be the truth." Sherlock Holmes. Last edited by Dave A; 08-04-2016 at 08:56 PM.
|
|
#72
08-05-2016, 12:12 AM
|
||||
|
||||
|
You can also repair speaker tears with tea bag paper and flexible glue (such as fabric glue).
Phil Nelson Phil's Old Radios http://antiqueradio.org/index.html
|
|
#73
08-05-2016, 02:18 PM
|
||||
|
||||
|
I've always used single ply toilet tissue and nail polish, but the lacquer can get old and brittle so it's not the best long term solution.
Looks like they didn't completely spray a portion of the safety glass sill, think I can make up for it with some toning lacquer?
__________________
Evolution...
|
|
#74
02-19-2017, 05:15 PM
|
||||
|
||||
|
Finally found some time to monkey with this some more, been a long time coming! Special thanks to Cliff Benham, for locating a nice set of NOS speakers to replace the ones that were not salvageable. The high frequency one in particular was an oddball, some odd fraction between a 4 and 5" speaker.
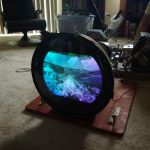
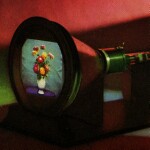
As you may recall, before I was able to get a raster on screen but not much else. I decided I wasn't getting anywhere trying to mess with it having HV and everything else running since it's quite hazardous poking around the chassis with wires going everywhere, so I took the test rig back apart and set it up to receive OTA signals while observing the cathode wave forms with a scope- sans vertical and horizontal sections. I didn't get anything but noise at first, then I remembered that's normal with the horizontal section off because there's no AGC. So I dragged the alignment rig over so I could use the negative supply that's built into it, and set it for -4.5v like the schematic says. Still nothing. At this point I took a break, because there's no use fighting yourself when you're at an impasse. Is the tuner dead? Sure hope not, I hate tuners! When I came back a few jack and cokes calmer, I fired it up again and verified there was still nothing. Double checked the connections to make sure I hadn't missed anything, and I hadn't. Time to verify voltages in the IF pin to pin, to see if they match the schematic. First IF and second IF tubes were good, but the third had high plate and screen voltages- bingo, it's not drawing any current! Took the 6DC6 third IF tube out and tested it, and it was fine on the tube checker. So I put it back in and still had nothing, but that's when I noticed the shield that goes around it was still stone cold despite being on for more than 10 minutes. A ha! Must be the filament supply going to that socket... no, there's voltage there as well. Dirty socket? Yep, worked the tube back and forth and eventually it lit up and a staircase appeared on the scope! I should have guessed that was the problem, since the horizontal output tube won't light unless you futz with it either. So this chassis still needs a really good socket cleaning before it's done, I'll make a mental note. I decided to go for broke at this point and see if something would show up on screen, but I didn't want to mess with the test jig anymore. What to do? Well I didn't want to risk the original CRT either, so I shoved a glass tube into the chassis, made all the connections and hit the switch: at last, a luma staircase appeared on screen!  The picture wasn't locked vertically or horizontally so I had to adjust the horizontal slug, but then a nice staircase was up and stable. At this point I think it's time to spritz some deoxit into all the controls and work them, reassemble the chassis and CRT combo and see what happens. Hopefully I'll be able to post something resembling a proper picture next time!
__________________
Evolution...
|
|
#75
02-20-2017, 11:34 AM
|
||||
|
||||
|
Good progress! Looking forward to more and hopefully soon, screen shots!
__________________
[B]"Bee care-eh-full to don't broke thee pic-sher tee-yube!" :-)
|
| Audiokarma |
 |
|
|


 Linear Mode

