
|
|
|
#61
 10-24-2010, 04:30 PM
|
||||
|
||||
|
Strange - I've never had shellac go bad. I've been using the Zinsser brand. I prefer it to lacquer for grain and minor ding filling as it seems to shrink less over time. Then I use Deft Sanding Sealer over that.
Speaking of which, I made some good progress on the cabinet this weekend. The weather has been very cooperative - 70F today. After the sanding sealer, I used a couple light coats of Mohawk Van Dyke Walnut on the old veneer and three coats on the new veneer which was a little lighter. 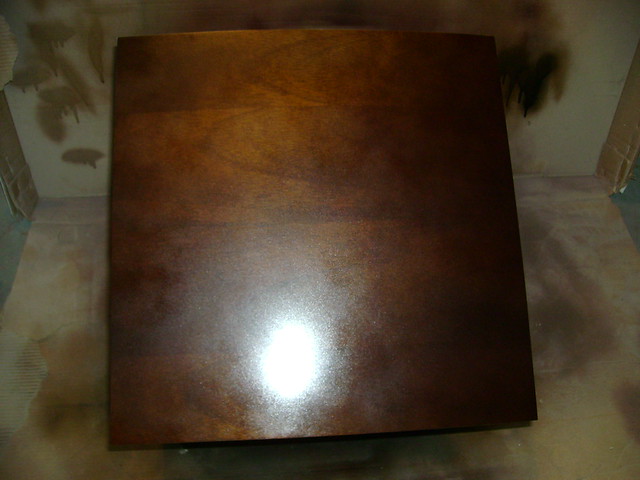 Then 3 coats of Deft Gloss. Once that cures, I'll sand it lightly and put on another 3 coats. 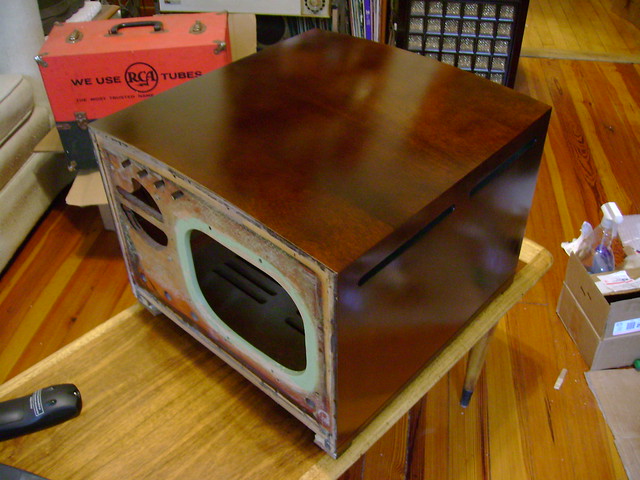 I also polished up the rest of the lower portion of the control panel. 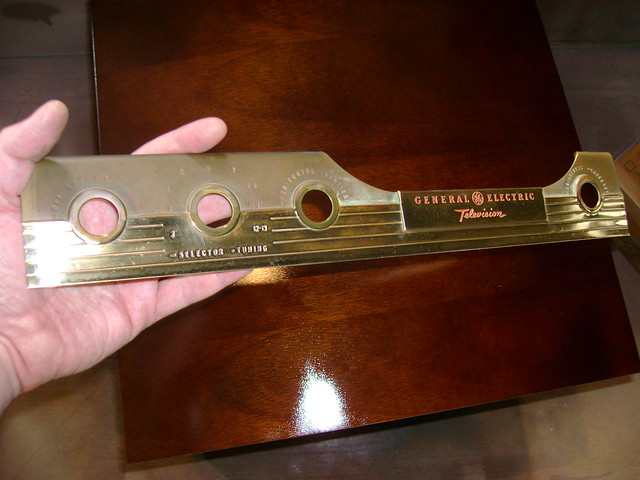 I'm not sure about the burnished top section though. I tried some Simichrome on it and it does look better, but it's a little splotchy  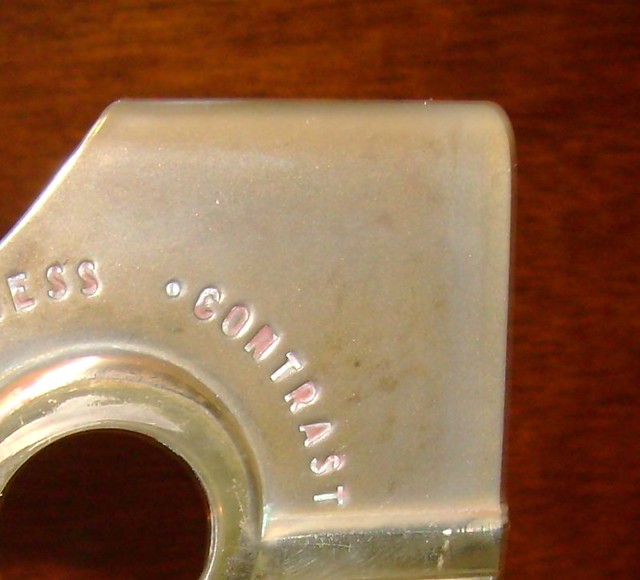
Last edited by bandersen; 10-24-2010 at 11:30 PM. 
|
|
#63
10-25-2010, 08:09 AM
|
||||
|
||||
|
Hey, Bob.
Don't worry about the red paint in the brass bezel lifting or crazing when you clear coat it. It's so dried out it doesn't matter if it was lacquer or enamel. The clear coat shouldn't react to it. ...and even if it does (highly unlikely) you could squeegee in water based red paint AFTER a lacquer clear coat. I did this with my GE 805 brass escutcheon, and the fresh red paint really made it pop. Wait until the clear lacquer hard dries. To tell you the truth, I would buff the hell out of the shiny portion, mask it off with a rubberized tape, then lightly glass bead the matte section for a uniform finish. Use fine bead and light pressure. Clear coat the entire brass, let hard dry for a week, and fill in lettering with red paint. Tamiya Color Flat Red XF-7 is a perfect match for that shade of red, BTW. It's water based, and won't react with the lacquer. Available at good hobby shops... 
Last edited by M3-SRT8; 10-25-2010 at 08:28 AM.
|
|
#64
10-26-2010, 09:15 PM
|
|||
|
|||
|
Hi Bob,
Well, I picked a GE 810 and a Philco 49-1040 tonight. So I will continue to follow this thread and the Philco 49-1040 thread with great interest! Nice work so far. I hope I can do as well.
|
|
#65
10-26-2010, 09:22 PM
|
||||
|
||||
|
Now that's a bizarre coincidence! Did you have your choice of sets or were those the only two ?
Quote:
Quote:
I did manage to make more progress using brass polish. Not too bad I think. After a bit more polishing, I'll take a chance with some Mohawk lacquer specially formulated for brass. 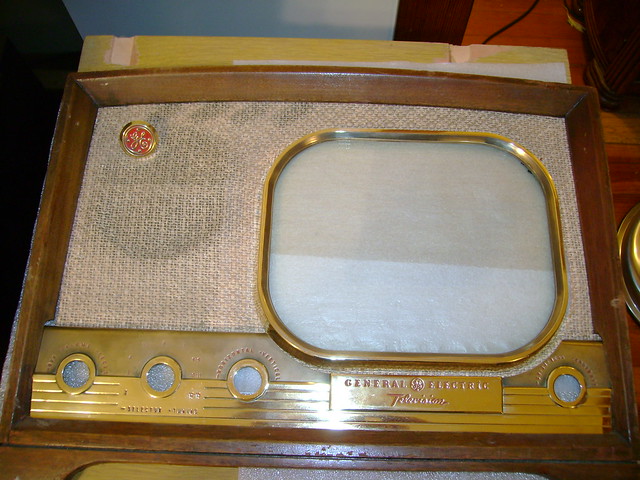
Last edited by bandersen; 10-26-2010 at 11:43 PM.
|
| Audiokarma |
|
#66
10-27-2010, 05:47 AM
|
||||
|
||||
|
Beautiful restoration. I was admiring the front panel before photo you earlier posted and the after photo above -- its striking improvement in appearance. BTW, where did you get the speaker cloth?
Carl PS: I enjoy the detailed explanations. Keep them coming.
__________________
CW 1950 Zenith Porthole - "Lincoln"
|
|
#67
10-27-2010, 08:41 AM
|
|||
|
|||
|
Quote:
So I bought those two and a Motorola VT-71 with Channel 1. Now, I have 5 VT-71 sets and I have restored one of them. Unfortunately, I won't have time to work on any of the sets for several weeks, maybe months. Lots going on with the family and friends.
|
|
#68
11-01-2010, 08:43 PM
|
||||
|
||||
|
I'm just about done recapping
 This one has me a little puzzled though. The parts list calls for a 0.0022 (2200pF) paper cap. What I found is this sangamo cap. It does appear to be 2200, but I'm not sure about the composition. Micamold or real mica and what do the two green dots mean ? 
|
|
#69
11-01-2010, 09:34 PM
|
||||
|
||||
|
2200pf... it's a micamold. Get it out of there.
__________________
The world's worst TV restoration site on the entire intranoot and damn proud of it. http://evilfurnaceman.tripod.com/tvsite
|
|
#71
11-01-2010, 09:56 PM
|
||||
|
||||
|
OK, thanks. I'll use a 0.0022 poly cap.
This is an old reference photo from before I started working on it. All the other caps have been replaced 
|
|
#72
11-01-2010, 10:18 PM
|
||||
|
||||
|
I wouldn't change that one at all, pretty sure it's Mica, it may have some stability issues if you replace it with Poly.
If I read this chart correctly the first Red dot indicates it a JAN Mica Capacitor, Red, Black, are the first two digits and Brown is the Multiplier. Teh left side green dot is the voltage, 500v. Here are a couple charts explaining the dot codes. http://www.tpub.com/neets/book2/3g.htm http://www.tpub.com/neets/book2/3g.htm I've run into problems before replacing the square molded caps with regular Polys, even if they are paper there is probably something special about them, temperature, tolerance or whatever.
|
|
#73
11-01-2010, 10:43 PM
|
||||
|
||||
|
I'm guessing it really is molded paper. I had a few of these I've replaced. I think the middle green dot means +-5%. The left dot might mean 500V, or it might be a temperature characteristic.
What do they list fo the voltage rating in the parts list? Time passes... Well I just looked it up in the Riders and I think I bet wrong. The one I see listed there is a Mica like Eric said. John
|
|
#74
11-01-2010, 11:45 PM
|
||||
|
||||
|
Hmm. Eric's linked chart results in a 200 pF cap doesn't it ?
It's C47 in Riders. It's listed as a 0.002 mfd 600v paper cap. It appears to be a coupling cap between the Clipper and AFC circuits. They also list C30 and C78 as the same type. Those were tubular paper & paper caps and I replaced them with poly. Heck C78 was even connected to the same tube right next to it. I can't find any evidence that C47 was ever replaced. So why would they use different type caps unless it was important ? I'll just leave it alone for now. Last edited by bandersen; 11-01-2010 at 11:56 PM.
|
|
#75
11-02-2010, 12:57 PM
|
||||
|
||||
|
Guess it doesn't quite fit the standard paper mold. I would interpret it as paper 2200pF, 600Volt and 5% using the colors, but guessing on the order of the dots.
It's strage that none of us have found a catalog or the like that explain these oddballs. John
|
| Audiokarma |
 |
|
|


 Linear Mode

