
|
|
|
#1
 09-27-2007, 04:55 PM
|
||||
|
||||
|
Needing to test a 21fjp22...
Lost my CRT tester and rejuvinator... Anyone selling one or know any other means?? Think my tubes weak on my CTC-16.. When it warms up it looks better.. Also when I first got this set to power up, raster flickered between greenish to pure, but still needed color balancing... Was way to green with retrace lines. Looks better now but washed out and out of focus a liittle even with a good 1v2, 3A3 and 6BK4..

|
|
#2
09-27-2007, 09:30 PM
|
||||
|
||||
|
Well, im pretty sure I might have found the problem tonight for sure.. I have no way to measure HV, mainly the 20KV I should be recieving. Turned on the set this morning, definate vertical issue, height was cut off 6" top and bottom and lines were spread on the top, one minute later the pic comes back to normal. But the set was on for an hour tonight, the screen started to get green, then the vertical started shrinking, about an inch top and bottom, the horiz is touchy, and I turned the set off, turned it back on and an arcing sound was heard, think it's the flyback.. Can the flyback cause the pic to have a bad raster, dropping off vertical height and the crt losing blue? Red looks lousy as well. Thanks!
|
|
#3
09-27-2007, 09:43 PM
|
||||
|
||||
|
BTW, there is wax all over the coil under the main flyback, the flyback winding has a crack in the coiling, the rubber looks okay, if this is bad(im sure it is) where, can I get a new flyback?
|
|
#4
09-27-2007, 09:56 PM
|
||||
|
||||
|
before you invest in a new flyback, you need to see what the HO cathode current is set at. if its excessive (over 200ma) then the flyback will burn up. I will usually run it at about 170 - 195, just enough for the Ho tube to conduct properly. Keeping that flyback cool is the secret to keeping it alive. The fly also shouldn't affect the raster grayscale either. You could have a gassy CRT or have a short in one of the guns.
If the vertical and horizontal were wonky that would suggest a power supply problem. I would have re-capped the power supply and check the HO cathode current as soon as I knew the set was working. Leaving the old electrolytic caps in there is only asking for trouble. I would test the HO tube and damper. Make sure there is no grid leakage on either tube.
__________________
Jordan
|
|
#5
09-28-2007, 01:19 AM
|
||||
|
||||
|
Well, I tested the damper and the HO tonight again and checked for shorts.. I noticed that when the HO tube is in the tv it's got a blue glow on the side of the tube.... Not doing it in the tester.. Do you guys know how I can get new power filter caps for the set? Iv'e read up on how someone takes the cans apart and adds them in and reinstalles the can covers.. Kinda cool, but I was hoping to find replacements.. The first cap, has part no. 974576-25 the 2nd 974576-31 the the 3rd 974576-33
Thanks!! Last edited by freakaftr8; 09-28-2007 at 01:53 AM. Reason: not finished
|
| Audiokarma |
|
#6
09-28-2007, 11:48 AM
|
||||
|
||||
|
You'll never find the exact replacements.
Antique Electronics sells replacement cans, but you won't be able to get the exact values. They are also VERY expensive What I will usually do is mount a terminal strip underneath the chassis and install individual values for each section of the can and wire it accordingly. You can rip the can out of the chassis and mount the terminal strip on the top if your tight on space, but most CTC-16 chassis like yours will have ample room underneath.
__________________
Jordan
|
|
#7
09-28-2007, 11:50 AM
|
||||
|
||||
|
Quote:
A quick 'n' dirty test for filter caps is to use a VTVM (NOT a regular voltmeter; won't work), and set it on the AC scale... Measure the AC voltage at each can terminal. Set the scale to 500vac, then on each one, set it lower and lower until you get a reading. There should be almost no AC present after a second or two. If there is, that one's probably leaky. You can do the same with a scope. a very slight AC voltage is OK. You just don't want to see 10 or more volts AC in most cases. Charles
__________________
Collecting & restoring TVs in Los Angeles since age 10
|
|
#8
10-02-2007, 04:02 AM
|
||||
|
||||
|
So back to my original question, anyone in the greater Sacramento area, have a pic tube tester they would lend me, Ill exchange collateral, if neccesary. I just got finished with the infamous cataract removal on the 21fjp22. The instructions were awesome! I manufacture plastic welding equipment and I found that a professional heat gun worked like a charm!! I didnt need to pry on the glass at all! it just started sliding around and i picked it up and off! Then the PVA just rolled off the CRT!
|
|
#9
10-02-2007, 11:57 AM
|
||||
|
||||
|
That's good news on the cataract removal! I didn't have quite that easy of a time, and I did use a 1500-watt heat gun. Did you have the tube sitting facing up, or was it propped facing sideways (as if in the TV?)
If I were closer, I'd be happy to help on the CRT checker. There are usually plenty of them on eBay. Typically $25-$80 depending on what it is. I'd just get a B&K 465, being sure it comes with the big color socket adaptor. Here's one now, and there are 3 others showing with a quick search. These usually work fine, as long as you spray-clean the switches. http://cgi.ebay.com/Vintage-B-K-Mode...QQcmdZViewItem Charles
__________________
Collecting & restoring TVs in Los Angeles since age 10
|
|
#10
10-02-2007, 12:43 PM
|
||||
|
||||
|
Thanks for that info Charles! Im going to see if I can get one off there. Well, I removed the CRT, removed the magnetic convergance coils, then I propped the tube face up in a 5 gallon bucket, these work great! Just put a towel around the ring to support the tube, I used a sweater, the neck is still 4" above the ground with these buckets. I used a 3000 watt Steinel heat gun 220v. I worked from the edges to the center in a circular motion at 750 degrees. at this rate the PVA came unglued quick, what happened next is after the 5" of bad PVA I could see the material letting go of the glass until the center finally lifted, then I heard a quick pop as the glass shield let do completely. There was no prying with wood dowels, I used kevlar gloves and grabbed the glass and removed it. It didnt try to stick anywhere. Then I peeled the PVA from the CRT, worked like magic! What I think all the other guys were having issues with is they were not getting the glass hot enough, but I know not everyone has these heat guns handy... But I do sell them if anyone ever needs to do this.
|
| Audiokarma |
|
#13
10-02-2007, 09:38 PM
|
||||
|
||||
|
Quote:
Drawing Number 974576-31 - RCA Part Number 114001 Drawing Number 974576-33 - RCA Part Number 114600 Check with Moyers Electronics (Google them, or go to moyerelectronics.com) - They are RCA/Thomson Distributors and likely have the caps. I've had great luck with NOS caps that have been reformed (by slowly bringing the cap to max working voltage with a current limited supply) - the military does this with shelf stock, and I do it with my Sencore LC102. "You'll never find the exact replacements." - Why the despair? I have 231 New Can caps - Mallory, CDE, Sprague, Zenith, RCA, GE, and NAP. And I paid no where near 40 bucks a piece, either. Don't give up in finding vintage electronic parts - there are far more resources out there if folks would only look. Cheers,
__________________
Brian USN RET (Avionics / Cal) CET- Consumer Repair and Avionics ('88) "Capacitor Cosmetologist since '79" When fuses go to work, they quit!
|
|
#14
10-05-2007, 01:47 AM
|
||||
|
||||
|
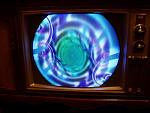
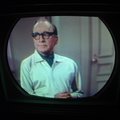
Hey guys, well I replaced all the filter caps and removed the cataract on the 21fjp22. I am in the midst of purchasing a B&K 465 crt tester. What I can say now is I powered the set up tonight.. Tried to balance the screen drives. Green is at half, Red is at half, Blue is cranked all the way up to achieve a good white balance. CRT is still kinda dim and a bit washed out looking, especially the whites and tint is cranked all the way to the left so the pink faces are kinda beige. I'll snapshot a pic in a bit..
|
|
#15
10-05-2007, 02:32 AM
|
||||
|
||||
|
You'll need to get that tracking sorted out. These sets can make an excellent picture, but are not as bright as modern sets.
Kick it into "service" with the service switch, and with the screens set low, crank them up one at a time until each one barely makes a line. What this does is collapse the vertical to let you balance the screens at a brightness level below black. Before you go much further though, there is a "kine bias" switch on the back. The screen setting should be done at the dimmest setting of the kine bias switch that will allow you to get a line with all three colors. Turn each screen up until all three lines are the same brightness. This will be kind of hard to see because maybe two will land on top of each other and the other will not. Look at the dots. Get them all the same brightness. Now flip it back out of "service" mode and get a picture. Turn the chroma (color) control all the way down. Adjust the brightness and contrast so you have some white areas in the picture, but so that they are not blooming. Set the drive controls until these areas are white. Setting the drives will screw up the screen settings a little, so flip it back in service mode and go set the screens again. Keep going back and forth until both are right. If you get this right, the guns should track all the way from black to white. In a dimly lit or dark room, adjust the brightness and contrast until you have a nice black and white picture with no blooming. Turn the chroma back up until you have a little color, and adjust tint until the fleshtones are right. It should look a lot better now. John
|
| Audiokarma |
 |
| Thread Tools | |
| Display Modes | |
|
|


 Linear Mode

