
|
|
|
#1
 11-14-2010, 10:26 PM
|
||||
|
||||
|
Director 21 resto begins....
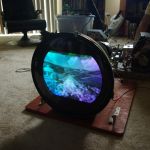
This weekend, I began on what's sure to be a long resto on the CTC-4B chassis I hauled home from Indy. Why long? This set was apparently in operation in the same household from the time it was purchased until at least 1976, as evidenced by the repair tags left by RCA techs over the years. There are some ugly looking hack repairs, which will need undoing if it's ever gonna work again. CRT it had was a factory rebuilt 21AXP22, date code says 6543- which seems kinda odd. I would have thought they would've replaced it with a 21CYP22, but apparently the factory rebuilt metal tubes for a long time after they were 'out of service'.
First thing I did to the chassis was wipe most of the dust off, and test the tubes it had. All of them are good, so I won't have to worry about them. First thing I noticed was the power input jack was destroyed, so it will need to be replaced. Looked like the cord had melted to it, but the power trans ohms out fine (crossed fingers for the PTX). Next, I turned my attention to the HV cage. Looked good at first, but a second look revealed a burn under the horiz centering pot and a blown capacitor. Some past tech had wired the (replacement?) caps in totally wrong, which lead to the pot smoking. It will need to be replaced with a new one. Other than that, the horiz output transformer looks brand new so I hope the pot is the only trouble I have with the HV section. Next, I pulled a few of the can caps and started restuffing them. They will have all new caps installed inside the old cans, then I'll reinstall the cardboard covers so it looks factory. After the rest of the power supply caps are replaced, I'm going to go ahead with a cursory run of the chassis to see what's alive at this point. I'll bring it up slow with the variac, and if nothing blows I'll probably recap the horizontal section so I can tell if HV is good to go. More after next weekend! 
__________________
Evolution... 
Last edited by miniman82; 12-25-2014 at 07:15 AM. 
|
|
#3
11-15-2010, 12:20 AM
|
||||
|
||||
|
Some guys get to have all the fun!
|
|
#4
11-15-2010, 09:45 AM
|
||||
|
||||
|
This'll keep you off the streets for a while! Keep us up on progress. Do you know the CRT condition? Can lend you the tester if you need it (after Thanksgiving).
|
|
#6
11-15-2010, 04:12 PM
|
||||
|
||||
|
It is always possible that you have a leak somwhere at the glass/metal union, however the work that John Folsom and I have done with leak testing suggests that the more likely point of leakage is the weld that joins the front and rear sections of the crt. In that case it is not likely that frit glass would be of much use in sealing the leak. Frit glass is used to seal the leaks on the glass/metal or glass/glass joints.
There is also the possibility that your 21AX has a leak on one of the leads at the gun end, but a weld leak is more likely. By the time they started making 21AX crt's, the technique of bonding glass to metal cone crt components, was very well perfected. It is likely that there was a small weld leak in the tube before RCA rebuilt it. RCA probably saw silver getters on the dud, and figured the dud was air tight, and so they went ahead and rebuilt it. The leak is so small that even today your getters are still silver, but it only takes a very tiny leak to let enough air into a crt to destroy it. After RCA rebuilt your tube it likely worked fine for quite a while until enough air got in to prevent it from working. John Folsom and I are in the process of getting our used helium leak detector up and running which will allow us to pinpoint where the vacuum leaks are. Then we will need to proceed with a process to repair weld leaks. Progress has been slow, so don't hold your breath. Hopefully some day we will be able to repair the leakers and have them rebuilt.
__________________
Vacuum tubes are used in Wisconsin to help heat your house. New Web Site under developement ME http://AntiqueTvGuy.com
|
|
#7
11-15-2010, 06:49 PM
|
||||
|
||||
|
That's great news!
What's the deal with welding the funnel, is it a heat issue or the type of metal? And you're right, from what I can see there's still a getter there. I take it the leaks are too small to be found by traditional means (like dye inspection)?
__________________
Evolution...
|
|
#8
11-15-2010, 07:25 PM
|
||||
|
||||
|
Quote:
I am using the "rubber" shield from the 21AX to shield the HV button on the 21FB - can you slip that between your tube and your mounting hardware? Doesn't look elegant, but works, and can still be re-used if I get a good 21AX.
|
|
#9
11-15-2010, 08:33 PM
|
||||
|
||||
|
Quote:
BTW, Waynem your 21ax is in safe keeping :-) I will drag it to ETF next year for you to take home with you.
__________________
Vacuum tubes are used in Wisconsin to help heat your house. New Web Site under developement ME http://AntiqueTvGuy.com
|
|
#10
11-15-2010, 09:40 PM
|
||||
|
||||
|
Interesting.
Can't detect the bad weld via x-ray inspecting either? We use x-ray and dye penetrant inspections in the military all the time to look at welds, check critical aluminum parts for stress cracks, ect.
__________________
Evolution...
|
| Audiokarma |
|
#11
11-15-2010, 09:56 PM
|
||||
|
||||
|
Quote:
John
|
|
#12
11-15-2010, 10:36 PM
|
||||
|
||||
|
Quote:

__________________
 Do not attempt to adjust your set.
|
|
#13
11-16-2010, 12:00 AM
|
||||
|
||||
|
Nice flyback, still looks raw and uncooked!.
|
|
#14
11-16-2010, 06:30 AM
|
||||
|
||||
|
Quote:
Red Raster: Yes, either it's a replacement or these things are easy on FB transformers. It looks brand new, only mark that I can see is some slightly melted wax on one side and it's from rectifier tube heat.
__________________
Evolution...
|
|
#15
11-21-2010, 11:05 PM
|
||||
|
||||
|
New updates, from this weekend of deer hunting/CTC-4 rebuilding!
Didn't bag any deer, though.  First I went about reinstalling the first round of restuffed power supply caps, which went well. So far all of the cardboard can covers have come off with little or no heat applied, so that's good. At this point I have both caps from the doubler portion done, and one of the others which is in the audio output section. Only 2 more multi-section caps to go, and the power supply is done. (3rd pic is the restuft caps. I also cleaned the front of the chassis up, and the results are stunning! Under all the old cad plating there was nice shiny metal waiting to come out, so I went ahead and did the entire front where the controls are. First pic is the nasty state of the chassis before cleaning, second is a shot of the front after a good de-gunking. Bonus: the tuner appears to be in working order, no stuck shafts or anything. Even the cords are in good shape, so it looks like a little lube and Deoxit will be all the tuner needs to come back to original glory. Items for next week: finish the restuffing, do more work cleaning up the chassis, and probably test fire on the variac to see what's still alive!
__________________
Evolution...
|
| Audiokarma |
 |
| Thread Tools | |
| Display Modes | |
|
|


 Linear Mode

