
|
|
|
#31
 09-09-2011, 11:29 AM
|
||||
|
||||
|
Cabinet is looking great. Was the original cloth to far gone to re-use? There are some nice reproduction guitar amp patterns that would look pretty sharp with the dark mahogany finish. I'm thinking pattern FA 1045, FA 1050,
or DF6002 would go very well with your sets gold trim. I'm afraid black could end up looking like a big dark hole. Of course it's all a matter of personal taste. http://www.vibroworld.com/parts/tech10.html Last edited by Kevin Kuehn; 09-09-2011 at 11:33 AM. 
|
|
#32
09-09-2011, 11:39 AM
|
||||
|
||||
|
Hmm, that FA1045 looks yummy. Yes, the original stuff was toast and it looked horrid anyway. I'd rather have 70's shag carpet than the stuff this thing originally had.
__________________
Evolution... 
|
|
#33
09-09-2011, 12:00 PM
|
||||
|
||||
|
Quote:
I don't have any of that one, but here's what the Oxblood/Gold looks like against my CTC-11's mahogany cabinet. FYI this stuff is a very open plastic thread weave, so you need to paint the speaker board a matching color. Last edited by Kevin Kuehn; 09-09-2011 at 12:07 PM.
|
|
#34
09-09-2011, 01:26 PM
|
||||
|
||||
|
Well the fabric is an easy thing to change, so if I need to I can swap it out in like 10 minutes.
Here's what the legs look like now. Simply chuck the leg up in a drill by the threads, then apply Testor's gold flake model paint with a small brush while rotating it around. The back 2 did not get any gold trim, only the front. My CTC-4 is the same way, so I figured why go to the trouble when you can't see them anyway? Also had to buy new nylon feet, the old ones were toast.
__________________
Evolution...
Last edited by miniman82; 05-15-2017 at 03:30 PM.
|
|
#35
09-09-2011, 07:35 PM
|
||||
|
||||
|
Well that was abortive, the gold paint slid right off as soon as I put poly on it. lol
Time for plan 2, just need some time to think what plan 2 is. 2 Sides have now been stained, just the top and left side to go.
__________________
Evolution...
Last edited by miniman82; 05-15-2017 at 03:30 PM.
|
| Audiokarma |
|
#36
09-09-2011, 08:13 PM
|
||||
|
||||
|
Two ideas. If you can get the brass pieces off you could send them to a metal polisher (if you do that lacker them after wards to prevent future tarnishing), or have them plated.
Green would also be a nice cabinet complementing color for the grill cloth(I was waiting to see the stain color to comment on that). Tom C.
|
|
#37
09-09-2011, 09:43 PM
|
||||
|
||||
|
Quote:
You need a lacquer paint for the gold. Poly is enamel and it will not strip lacquer. However you cant go the other way. If you put gold enamel (like Testors) first then apply enamel or lacquer, you will take the gold off. Use lacquer first then enamel can go over the lacquer.
__________________
Vacuum tubes are used in Wisconsin to help heat your house. New Web Site under developement ME http://AntiqueTvGuy.com
|
|
#38
09-09-2011, 11:07 PM
|
||||
|
||||
|
Most of those brass ferrules originally had a brushed finish on them. Why not stick them on a leg, chuck it in a drill, and steel wool or emery cloth the finish back? Then you can clear coat with poly.
 Stain looking good.
|
|
#39
09-09-2011, 11:22 PM
|
||||
|
||||
|
Because they were all beyond repair, cracked and corroded to hell. I'll look for a different paint, since that was working great till it sloughed off. lol
__________________
Evolution...
|
|
#40
09-09-2011, 11:35 PM
|
||||
|
||||
|
Oh, ok. Guess I need to pay closer attention.
|
| Audiokarma |
|
#41
10-09-2011, 06:22 PM
|
||||
|
||||
|
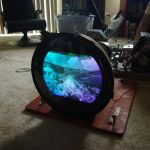
First pass of sanding sealer, I can tell it's gonna look great when completed. The top appearing darker is because there was more light over the cabinet, they are the same shade when viewed in the same light.
__________________
Evolution...
Last edited by miniman82; 05-15-2017 at 03:31 PM.
|
|
#42
11-12-2011, 06:34 PM
|
||||
|
||||
|
Front now has 2 coats of poly on it, the woodgrain is really starting to pop. I think the front will get block sanded with fine grit one more time, then a final coat of poly. Gonna look sweet behind that shiny RCA logo.
 Ignore the smudges, they are not in the finish (only finger oil). I had to remove a section of veneer on the right side of the cabinet, because it started to bubble and lift off. I figured I might have to redo that piece anyway, since it didn't take stain very well and ended up too light. I have just enough left over to replace that section, luckily. 3 out of 4 legs are now done as well, they turned out very nice. I figure 2 or 3 more weekends worth of work and this will be done.
__________________
Evolution...
Last edited by miniman82; 05-15-2017 at 03:32 PM.
|
|
#43
11-13-2011, 02:11 AM
|
|||
|
|||
|
Faux photo finish- " the rest of the story"
Excellent methods , sounds like great craftsmanship;
TRY THIS; INFORMATIVE, AND FAIRLY ACCURATE- (THEY MAKE IT LOOK EASIER THAN IT IS) www.xrestore.com/Pages/FauxWoodGrain.htm Here is the whole scoop on the Photo Finish: It is a series of painting, glaze, and methods of application of glaze with a stiff brush, (after period of getting jelly like)- ( then fine, (real fine------ sand paper. ) Let's put it this way; much like walking from Portland to Seattle , vs , taking a 1/2 hour airline trip. (modern methods)- commonly used on old clocks; Here you go- Good reading, with web address  Faux Wood Grain Finish: Simulated wood finishes, created using paint, were common on many clock cases manufactured in the later part of the 1800's. Small "cottage" clocks as well as large "Triple-Decker" shelf clocks used this finish technique to reduce the use of expensive imported veneers. Genuine veneers were combined with the faux finish such that it was difficult to tell where genuine ended and faux started. On this cottage clock case, the red arrows point to genuine rosewood veneer while the green arrows point to faux rosewood. After 100 years or more of use, storage and moving, most of these clock cases show considerable wear and damage. With real veneer, you can often find matching "new" veneer to make your repairs. This isn't possible with a faux finish. To restore this finish, you must be able to reproduce the original grain using paints. Repairing or recreating faux wood finishes is accomplished using "glazes" which are nothing more than paints that have been thinned to the point of translucence. The techniques necessary to create authentic looking faux finishes are not difficult to master and require no special tools. Practice pieces (4 x 8 inches) can be cut from thin paneling or door-skin and used to perfect technique. Materials: Faux wood grain does not require a large investment in tools or supplies but it is important to gather up the needed materials and get organized before the first attempt. The following are basic materials you will need. My Philco was Mahogany; (Golden Grid ) - I was able to avoid doing a big "Faux finish" MY PIC ATTACHED-
|
|
#44
11-25-2011, 08:49 PM
|
||||
|
||||
|
Lots more progress, since I'll be at the house for the next few days.
So far, I attached a new section of veneer on the right side and stained it. Then I was able to apply the first pass of poly to the left side, so tomorrow when it's dry I'll go over it with fine grit and do the second pass. Left side turned out very nice, you can really see the grain popping. Still left to do is the application of sanding sealer to the right side, then it will be ready for the first pass of clear poly. It's getting to the home stretch now!
__________________
Evolution...
Last edited by miniman82; 05-15-2017 at 03:32 PM.
|
 |
| Thread Tools | |
| Display Modes | |
|
|


 Linear Mode

