
|
|
|
#1
 12-15-2002, 12:21 AM
|
||||
|
||||
|
Advice needed with a Monster of a Zenith
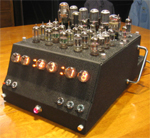
Well I've begun work on my 1951 Zenith Radio/Phono/TV combination. Everything on this console was inoperative when I first found it last summer. I've completely recapped and trouble-shot the radio and it now works beautifully. I took parts from two cobra-matic turntables to make one good one and it now plays my 78's wonderfully, all that work of course was the easy part. Now comes the part I've been waiting for, the big round-tube 19" television set. This will be my third restoration on a vintage TV and my most challenging set yet ( I'm still a rookie when it comes to vintage electronics). Anyway, I've tried the set out and while I did get sound from a local station, there was no raster what so ever and I did hear a sizzling sound so I cut the power pretty fast. I know the first procedure in this restoration will be to test and replace the tubes as well as replace all the paper and electrolytic caps. But my first and foremost concern with working with this chassis: SAFETY! As you can see in the picture below the picture tube is huge compared to the chassis, how is one suppose to work under this chassis with the picture tube in the place??? I don't believe its safe to turn the chassis on its side, resting the entire unit on the side of the picture tube, but how else would one take voltage measurements for proper trouble shooting? What do you guys with vintage TV experience recommend with this monster? I assume I'm going to have to remove the tube, do all the capacitor replacements, then reinstall the tube. Are metal/glass tubes even more dangerous to remove and handle then the all glass tubes, what should I be particularly careful of? Any bit of advice that you experts could give me would surely be appreciated.
One stroke of luck with this chassis is a few months ago I found the exact same TV Chassis (24H21) in a TV only unit. So I have two complete chassis and picture tubes to help make one good unit! Thanks again everyone. 
|
|
#2
12-15-2002, 12:51 AM
|
||||
|
||||
|
Beautiful set!
That is a great set!
The metal and glass tubes aren't any more dangerous in my opinion, maybe less so since there is that much less glass, they are also remarkably light compared to the glass tubes. You will need to R&R the tube to check on your progress although you can power the chassis up without the CRT and check for high voltage and B+ I would recommend finding a "Test" CRT like this one: http://www.audiokarma.org/forums//at...=&postid=19731 8XP4 I think they are or 8YP4, can't remember which one is the large neck tube. They show up on eBay all the time. It's much easier to handle and can be left in place while you work on the set and if you break it no big loss as long as you don't get hit by flying glass  The metal tubes are awful to work around because the entire metal cone is charged with high voltage, it's almost impossible NOT to get shocked if you work on it with that tube in place. Eric
|
|
#3
12-15-2002, 09:14 PM
|
||||
|
||||
|
Thanks Eric, good information. As for working around that big energzied metal picture tube, I plan on wearing yellow rubber dishwashing gloves and rubber sole shoes anytime I'm near the thing. I'll keep ya posted, hopefully I can make it through this shock-free. I'm going to order the caps tomorrow and hope to begin working on it by next weekend.
The 8XP4 or the 8YP4 test picture tube would be great, I would love to find one of those as it would make working on this chassis a lot easier, does anyone know which number is the large neck version? If anyone has an extra that they would like to sell please let me know.
|
|
#4
12-15-2002, 11:03 PM
|
||||
|
||||
 I just thought of one more question I need to ask. Both picture tubes I have are covered with a heavy coating of dust on the metal cone. Will it harm the tube in any way to take a soft damp cloth and wipe the metal cone down? Is there any coating that I might be taking off by using a soft damp cloth? I just thought of one more question I need to ask. Both picture tubes I have are covered with a heavy coating of dust on the metal cone. Will it harm the tube in any way to take a soft damp cloth and wipe the metal cone down? Is there any coating that I might be taking off by using a soft damp cloth?
|
|
#5
12-16-2002, 12:07 AM
|
|||
|
|||
|
Uni,
The test tube you want is the 5AXP4. Large neck 5" round screen. Go ahead and soap and water with a washcloth that metal cone CRT. The worst you can do is ruin the paper labels. I might be able to fix you up with a test tube. I have to actually test it in a vintage working chassis. Rob
|
| Audiokarma |
|
#6
12-16-2002, 01:17 AM
|
||||
|
||||
|
Quote:
The metal tubes don't have any Dag coating to worry about. Eric
|
|
#7
12-16-2002, 10:02 AM
|
||||
|
||||
|
Thanks Eric and Rob for your responses. I will go ahead and wash that metal cone gently (I guess I better not put it in my '55 Westinghouse Laundromat).
 Rob let me know if you have an extra 5AXP4 test picture tube, if you do I would certainly be interested in buying it and I'll search around for one locally too. Ill keep you guys posted on my progress, thankfully there is a lot of open space under this chassis so there is lots of room to mount 10 new electrolytic caps. Rob let me know if you have an extra 5AXP4 test picture tube, if you do I would certainly be interested in buying it and I'll search around for one locally too. Ill keep you guys posted on my progress, thankfully there is a lot of open space under this chassis so there is lots of room to mount 10 new electrolytic caps.
|
|
#8
12-30-2002, 10:23 PM
|
||||
|
||||
|
Update on my Zenith Restoration
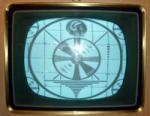
Hi everyone, I've been working diligently on restoring my Zenith TV and wanted to share my progress with you guys. I finally received a wonderful picture after three days of recapping. The current 19AP4 picture tube seems to be fine, although slightly weak, it still produces a nice picture. I have a second 19AP4 to try out yet and see if that tube is in even better shape. I took pictures along the way during my recap process...
|
|
#9
12-30-2002, 11:25 PM
|
|||
|
|||
|
Great Porthole!
Unimatic,
Thats terrific! I'll bet you are thrilled. Isn't it amazing how sometimes the last program that was watched before the TV was put into storage somehow stays stored in, it must be the picture tube, 'cause you replaced all the caps.  BTW, something I and many others here I am sure would like to know is, how did you find a workbench with so much cleared space?  Rob Last edited by Rob; 12-30-2002 at 11:30 PM.
|
|
#10
12-31-2002, 12:51 AM
|
||||
|
||||
|
Re: Great Porthole!
Quote:
Yes, that is amazing. Please try the other tube and see what program it has in it!  But seriously, isn't it amazing how it just gets better with each cap replaced!? That is a remarkable picture! Eric
|
| Audiokarma |
|
#11
01-01-2003, 02:52 PM
|
||||
|
||||
|
Well Now I'm Really Stumped
So I decided to try that extra 19AP4 picture tube in the Zenith, powered the chassis up and with the other tube installed I only received a very dim picture that can barely be seen with the brightness control turned all the way up and the room lights turned off. After trying to adjust the Ion Trap for a bit with only a slight increase in brightness I figured the tube was bad and reinstalled the original tube that I knew worked pretty well. Powered up the chassis and OH NO, its the same result a very, very dim picture. My first thought was I might have lost much of the high voltage so I measured it, the schematic says 12KV and I measured 10.5KV on the 2nd Anode itself. Does 10.kV sound too low or is it within proper range? I also took voltage measurements on the tube socket, pin 10 is B+ and measures 371, schematic calls for 360. Pin 11 calls for 36 to 79 volts and also checks fine. Now I'm really stumped, I had a nearly perfect picture just the other day. What might cause a suddenly very dark picture? Any suggestions as to what to check for would certainly be appreciated.
Quote:
Last edited by Unimatic1140; 01-01-2003 at 03:45 PM.
|
|
#12
01-01-2003, 04:26 PM
|
||||
|
||||
|
Hey Unimatic, let me just say that's a beautiful set you have there. I'm very jealous
About your problem, I would think 10kv would be sufficient, but let me ask, do you now have insufficient horizontal width? Is there any blooming or change in picture size when you adjust the brightness control? If it turns out that the set behaves normally but just is dimmer than usual I'd go back to the ion trap. There are two places on the neck where you'll get a picture, but you'll have much better results with the location closest to the socket end. Keep us posted 
|
|
#13
01-01-2003, 04:40 PM
|
|||
|
|||
|
zenith dim pix
i had something like that happen while swaping CRT's ,i had put the ion trap on backwards..i think there is an arrow on most of them that points to the direction it is suppose to be in.. forward?
good luck.. but just thought i'd bring it up terry
|
|
#14
01-01-2003, 10:31 PM
|
||||
|
||||
|
Clear and Wavy
Thanks for your advice guys, well it seems that for some strange reason the ion trap magnet has decided to reverse directions. When I turned it around the picture comes in bright, but I'm positive it was only working the other way around before, because I used to have to reach around the tube neck to undue the wing nut to remove the magnet, now the wing nut is on the other side so its easier to remove, go figure.
I tried the other picture tube and it is remarkably brighter and clearer, but its so clear that now I can see I have a wave moving from the bottom up to the top of the screen. Its hard to tell if its a one part wave (60cps) or a two part wave (120cps). Usually the electrolytic are suspected with this symptom but I've replaced all of them. Hmmm back to the old drawing board.
|
|
#15
01-02-2003, 05:48 AM
|
||||
|
||||
|
congatulations on the porthole!
remember that h-k leakage/shorts in tubes can cause the hum bar. i never change part of the caps and try the set so i havent seen the steps you show. i just get it over with and change em all and let the trashman sort them out
__________________
i collect and restore vintage radio's,tv's,and ham gear. email for more info
|
| Audiokarma |
 |
|
|


 Linear Mode

